How To’s

Table of Contents
Part 1
Part 2
Part 3
Intro ↺
This section is a work in progress and focusses a bit more on specific methods I use, some hints and tricks I have discovered along the way and some in-depth tips on specific actions.
The Mac Keyboard and Typography ↺
We all know the difference between straight quotes and curly quotes right? (" " vs. “ ”) How about a regular dash and an n-dash? These are important distinctions and unlike when using your helpful word processor, you are going to have to learn to enter them properly from the keyboard.
quotes
- left quote (“): opt+[
- right quote (”): opt+shift+[
- left single quote (‘): opt+]
- right single quote (’): opt+shift+]
dashes
- n-dash(–): opt+-
- m-dash(—): opt+shift+-
accents
- grave (á): opt+e followed by the necessary letter.
- acute (à): opt+` followed by letter.
- circumflex (ê): opt+i followed by letter.
- umlaut (ä): opt+u followed by letter.
BBEdit ↺
opening projects
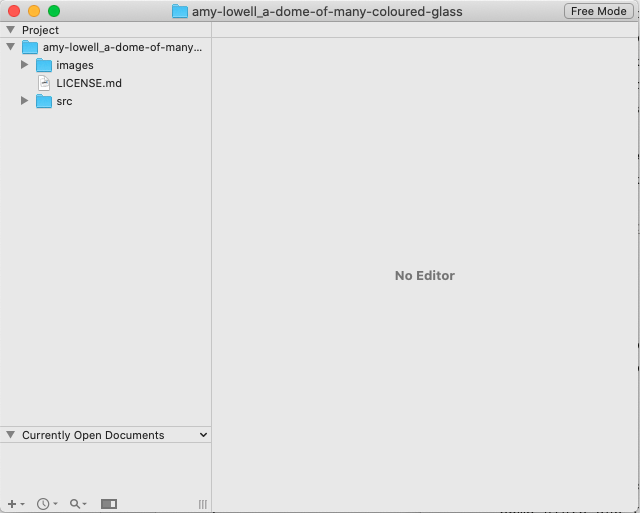
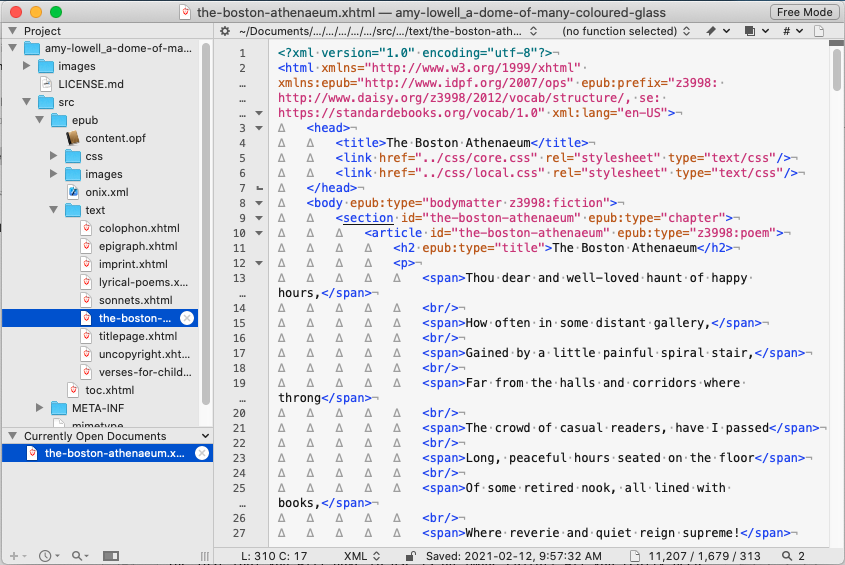
Open the project using File:Open but then click on the folder containing the project instead of any individual file and hit Open.

Now you can open individual files simply by selecting them in the left column.

Change Case
The SE toolset offer a way to change case, but frankly the workflow I’ve developed makes using BBEdit’s built in Change Case function. Out of the box there is no keyboard shortcut assigned to the various change case functions:
- All Upper Case,
- All Lower Case,
- Make Title Case,
- Capitalize Words,
- Capitalize Sentences,
- Capitalize Words.
But BBEdit is highly customizable and it is easy enough to go to BBEdit > Preferences > Menus & Shortcuts > Text and assign a keyboard shortcut to any one of the above (or any other menu function).
Be careful with Title Case as it uses a slightly different set of rules than Standard Ebook’s own Title Case command: se titlecase — generally it works just the same but it does have a harder time with subtle things like retaining the lowercase “d” in “Marchioness de Merteuil”.
Search and Replaces
This is where using an editor like BBEdit shines. Much of the work you do in creating a Standard ebook is searching out patterns created by the original producer and replacing them with a properly formatted ‘standard’ pattern. BBEDit’s Multi-File Search can make short work of a lot of the tediousness.
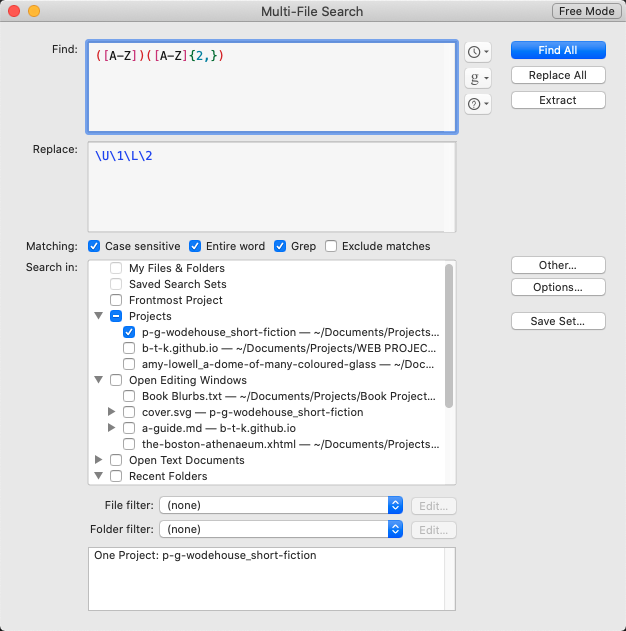
Remember to open your project (see above) rather than individual files. Then select Multi-File Search and ensure your project folder is selected in the Search in: box. You will also want to ensure that in most cases Case Sensitive, Entire Word and Grep are selected. Grep stands for “global regular expression print” and is the utility that uses any regexes you build to search the files.

The search and replace in the image will find words in all caps and replace them with upper/lower. We will look at the specifics of that later.
Search & Replaces and Regexes ↺
A guide to regexes is beyond the scope of this project and there are tons and tons of tutorial and videos about there that will attempt to teach you how to use them. If you are like me there won’t make a lot of sense until you start using them and suddenly the lightbulbs will go off. So let’s dive in with some simple ones you can expand on later.
A Basic Pattern
Let’s say you wanted to search for <h2>This is the title</h2> and replace it with <h2 epub:type="title">This is the title</h2>. First you identify the pattern, which in this case is text between two <h2> tags. Then you build a regex to identify this pattern:
<h2>.*?</h2>
The .*? wildcards will find all text and characters between the opening and closing h2s. But in order to replace the whole statement we need to copy the text between the tags into the replace statement. This is accomplished by placing the wildcard pattern between in parentheses (called a group): (.*?). This essentially writes that text into memory and can then be called back on the replace statement using a backslash and the number of the occurrence. So…
Find: <h2>(.*?)</h2>
Replace: <h2 epub:type="title">\1</h2>
Or if you had multiple tags you wanted to replace or delete like getting rid of the extra tags in the opening paragraphs: <p class="nind">A GIRL stood on the shingle that fringes Millbourne Bay</p>. You would then create multiple groups:
Find: <p class="nind">(.*?)<small>(.*?)</small>(.*?)</p>
Replace: <p>\1\2\3</p>
This will result in <p>A GIRL stood on the shingle that fringes Millbourne Bay</p>.
You will then have to run another regex to change the all caps to lowercase. If you needed to change the opening paragraphs across one or two chapters it might be easier to do it by hand, but if you had 30 or 40 chapters to fix it is definitely easier to spend a moment building the regex.
Note: When building regexes remember spaces, tabs and line breaks count so always try to accommodate them in your search.
Basic wildcards/metacharacters
\n— find new line (i.e paragraph break)\t— find a tab\s— find white space (including line breaks)^beginning of a line$end of line[]— find set e.g.[A-Z]capital letters between A and Z;[0-9]single digits between 0 and 9{x,y}— limit set e.g.[A-Z]{1,3}finds words with 1–3 capital letters in a row
Note: if you need to search for characters like a period, dollar sign or question mark etc. you will need to ‘escape’ it by preceding it with a backslash e.g. \$ will find any dollar signs and $ will find the end of a line.
|— Or i.e.this|thatwill find ‘this’ or ‘that’.*?— is your basic wildcard e.g. <p>.?</p> will find everything between the two tags. See *Advanced Patterns for a breakdown of this combination.
Basic replace functions
\L— set all text to the right as lowercase\l— first letter to the right as lowercase\U— set all text to the right as uppercase\u— first letter to the right as uppercase\E— end change case i.e. \U or \L
A bit more advanced
So what else can you do? In reality the options are unlimited but parsing the code can be a bit of a nightmare. There are online regex testers (regextester.com, freeformatter.com/regex-tester.html etc.) that will allow you to test out patterns before you try them on your project. Testing is often a good idea because while the undo function will often rescue you if you make a typo, every once in a while you will find you’ve made a mistake that is unrecoverable.
Look ahead or Look behind
(?=text)— finds the position that immediately follows ‘text’(?<=text)— finds the position that immediately precedes ‘text’(?!text)— asserts that what immediately follows the position is not ‘text’(?<!text)— asserts that what immediately precedes the position is not ‘text’
In other words if you have two sentences:
This is a fact about dogs.
This is a fact about bad dogs.
(?<!bad) dogs will find the position before dogs in #1 but not in #2 and you could then alter the text.
Find: (?<!bad) dogs
Replace: ` stray dogs`
would result in:
This is a fact about stray dogs.
This is a fact about bad dogs.
Some Advanced Patterns
Here is a handy RegEx Cheat Sheet to get you started.
.*?.means any character except returns\*means 0 or more of the . (If you use + instead it will only find things if there are 1 or more)?makes it non greedy i.e. it will only grab until the first instance.- Thus
<.*?>will find <h2> but <.+?> will find <h2>This is a head</h2>
- Thus
[0-9]{2,}— find any 2 digit numbers containing 0 to 9([A-Z])([A-Z]{2,})with\U\1\L\2- This would replace a word that starts with a capital and is followed by 2 or more capitals (e.g. SOD) with a single capital and the rest lowercase (e.g. Sod), but it would not change AD or BC.
External scripts
BBEdit also offers a way to run external scripts to extend its functionality. I have made a few to cover some of the more repetitive tasks like “rename file to clipboard” and “lowercase and dashes” (makes text url friendly) which you do a lot of when making headers for compilations and these again have keyboard shortcuts assigned to them.
Macs come with a program called Script Editor and it’s pretty easy to write (or download) simple scripts to take some of the drudgery out of making big changes
Sample scripts
lowercase and dashes.scpt Converts selected text to lowercase and replaces spaces with dashes e.g. “The Tale of Bobby McGee” —> “the-tale-of-bobby-mcgee”. Great for creating ids:
tell application "BBEdit"
	tell window 1
		change case selection making lower case with replacing target
		copy selection
		set theString to the clipboard
		set L to length of theString
		set P to the offset of space in theString
		repeat until P = 0
			if P = 1 then
				set theString to "_" & texts 2 through -1 of theString
			else if P = L then
				set theString to texts 1 through (L - 1) of theString & "_"
			else
				set theString to texts 1 through (P - 1) of theString & "-" & texts (P + 1) through -1 of theString
			end if
			set P to the offset of space in theString
		end repeat
		set the clipboard to theString
		paste
		select
	end tell
end tell
Rename Active Document to clipboard.scpt Rename the file to copied text (usually from the section id):
on run
	tell application "BBEdit"
		activate

		set doc to active document of text window 1
		set oldName to name of doc
		set newName to my promptForName(oldName)
		-- If the name did not change we can bail.
		if newName = oldName then return true
		my renameDoc(doc, oldName, newName)

	end tell
end run
add code on input.scpt This one takes a tag as input and wraps the selected text in it—very handy when adding lots of <blockquote>s or s:
tell application "BBEdit"
	tell window 1
		copy selection

		set theString to the clipboard
		set theResponse to display dialog "Enter html code without < >" default answer "i" buttons {"Continue"} default button "Continue"
		set theResponse to text returned of the theResponse
		set newString to "<" & theResponse & ">" & theString & "</" & theResponse & ">"

		set the clipboard to newString

		paste
		select
	end tell
end tell
There are lots of help files available but essentially you can just drop these files in the BBEdit scripts folder and then assign a keyboard shortcut to them in BBEdit’s preferences.
See Step-by-Step tools section on how to build a script and assign keyboard shortcuts for the se tools commands.
Git and Github ↺
The most important thing to know about Git is that if you do a good job of following the steps for producing a book and take it slow you won’t need to know more than the basics. The next most important thing to realize is if you do screw up, chances are Git will provide a way to recover from your mistake — it just might take some working through the more complex git functions.
Basics
When you create a new project you also create a new git “project.” This project is a series of files and folders that are in the same folder as your Standard Ebooks project but are hidden from the users view.
3 steps — 3 states
- The current state of your project files is “recorded” in the working directory.
- After you make a set of changes (generally as defined in the step-by-step) you will “add” them to the “staging area.” The state of the files is now “staged.” For the purposes of an SE project you will almost always move on to them next step before making any other changes.
- The staged files are now “committed” to the the repository. The repository contains a record of all the previous states so it is generally possible to revert one or all of the files to any previous iteration.
The “fourth” step is to “push” the files to the online repo (Github) so that it is publicly visible. Technically this isn’t necessary until you already to share it with your reviewers but it’s good to do it anyway incase you have questions and others what to check your work.
All of this can be done using Terminal and the command line—in fact it was designed to be used that way. If you want to learn properly right from the get-go that is probably the best way to proceed. But I started with Github Desktop and generally think that’s the better route for beginners. Some of the other texts editors like Visual Code and Sublime also have built in git tools so you can manage your text and repos from the same spot.
Some links to help you learn
- https://learngitbranching.js.org/
- https://rogerdudler.github.io/git-guide/
Github Desktop
Github Desktop is the tool I started with and I am pretty happy with it.
Check the My Process hint below to see how I step though using the GUI but there are just a few essential steps:
- Add the repo to GitHub Desktop
- Make your commits
- Publish or Push your changes to the Github website.
You can always go to your Github page and check to see if your files and changes are there. And dig around to see what sort of information/history is available.
Seeing Changes
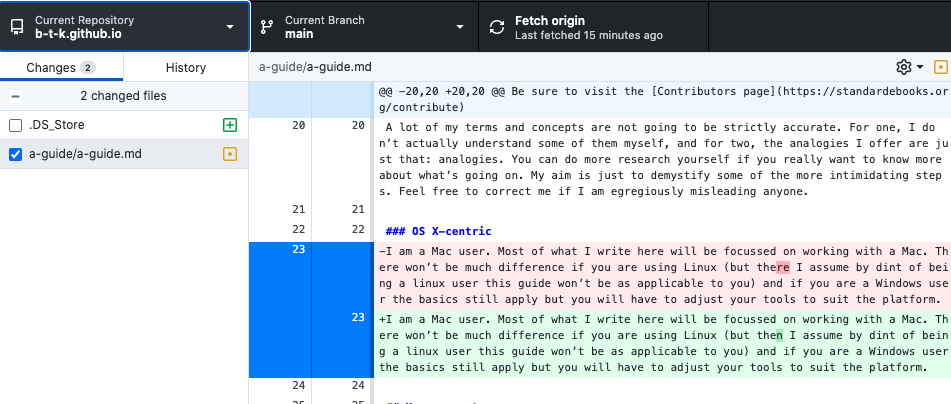
Git provides a tool to allow you see what has changed (just type git diff in the terminal), but this is way easier to do in the GUI.

So when you have done big global steps like typogrify or semanticate you can easily go through everything to see if the everything was done properly.
CSS ↺
As mentioned previously CSS is a big part of producing any ebook, and following standards is, after all, eponymous with producing a Standard ebook.
Much of the CSS you will need to use is prescribed by The Standard Ebooks Manual of Style. Often all you will need to be able to do is identify the particular type of style you are looking at (the most common ones will be dedications, letters, poems etc.) and then find the appropriate css from the manual to copy into the local.css file.
This is the base css for including poetry, straight from section 7.5.7 of the Manual:
[epub|type~="z3998:poem"] p{
	text-align: initial;
	text-indent: 0;
}

[epub|type~="z3998:poem"] p > span{
	display: block;
	padding-left: 1em;
	text-indent: -1em;
}

[epub|type~="z3998:poem"] p > span + br{
	display: none;
}

[epub|type~="z3998:poem"] p + p{
	margin-top: 1em;
}
What this does is find text in the project that is marked as poetry and apply certain styles to it. For example:
<blockquote epub:type="z3998:poem”>
	<p>
		<span>O Lady! we receive but what we give,</span>
		<br/>
		<span>And in our life alone does nature live:</span>
	</p>
	<p>
		<span>Ah! from the soul itself must issue forth</span>
		<br/>
		<span>A light, a glory, a fair luminous cloud,</span>
	</p>
</blockquote>
This poem appears in a blockquote (a standard html tag) with a tag (class) of z:3998:poem (an international web standard tag). Anything within that blockquote will have the above CSS applied to it.
This CSS essential states all p’s will have an indent of “0”; all span’s within that p will have a hanging indent and any two ps will be separated by a space between. You’ll get the hang of it but don’t worry too much.
Selectors
Generally you can do a quick google to find any css you might want to clarify or add. The only other css I will touch on are a few of the selectors. You will likely here are some point that you shouldn’t use a class for one instance—in fact there is an error that will pop up if you try.
To get around that you can target the text you was to format with a selection of pseudoclasses. Let’s say in Chapter 2 you have a poster that is supposed to appear centered. Rather than inventing a class called poster and specifying that it should be centered you could target it with some thing like:
#chapter-2 blockquote{
	text-align: center;
}
If there was more than one blockquote and the poster was in the second one you could use:
#chapter-2 blockquote:nth-of-type(2){
	text-align: center;
}
nth- selectors are very, very useful for more complex selection tasks. If you encounter something that needs special CSS, take a stab at it yourself with a little Googling, then ask the list to let you know if you are on the right track. Here are a few other selectors you might use:
- :first-child
- :only-child
- :last-child
- :nth-child
- :first-of-type
- :last-of-type
- :only-of-type
- :nth-of-type
Some quick hints ↺
- Make it easy on reviewers: include the links to your repos (repositories), include attachments with images, link to specific pages when providing source material etc.- If there is a translator then you need to use the translator switch:
se create-draft –author=“August Strindberg” –title=“The Ghost Sonata” –translator=“Edwin Björkman” --pg-id=44302 - .DS_Store files: managing etc. (coming soon)
- Tor Browser for geo blocking (coming soon)
My Process ↺
- Create general working folder in your projects folder i.e. Wodehouse Ukridge Stories
- Open Terminal and type “cd “ (then drag the working folder into terminal). Hit enter.
- Follow steps 1–3.
- I then create a “notes” file for storing important information:
- the full title, author and pub date
- the Gutenberg url
- the wikipedia urls (author and book)
- archive.org (or hathi trust) url for the scans
- eventually I will also add links to the cover art, artist and copyright “proof”
- I also store my long description here after I write it.
(dajare created a GIST template for his version which you can use if you would like )
In this file I copy the command from the step-by-step:
se create-draft --author="Robert Louis Stevenson" --title="The Strange Case of Dr. Jekyll and Mr. Hyde" --pg-id=43
And change it to reflect my own project:
se create-draft --author="P. G. Wodehouse" --title="Ukridge Stories" --pg-id=61507
- Change directory in Terminal to newly created directory: type “cd “ and drag the se folder into it
- Open the SE project folder with BBEdit
- In GitHub Desktop: Add (upper left where it says current repository)
- Add > Add Existing Repository > select created directory > Add Repository
- Follow Step 5 and do a rough cleanup
- In GitHub Desktop type “Initial Commit” in the “Summary (required)” box and click “Commit to master”
- Click Publish repository and then uncheck “Keep this code private”
You should then be a able to just follow the rest of the steps and add commits when the Step-by-Step calls for them, ignoring the command line commands that are supplied. Be sure to send the url for your GitHub repo to the list so they know you have started.
Handy links ↺
Start with the Standard Ebook Get Involved page. It has most of the links you’ll need.
- Step by step — This is the one to read first to see if you are up to the challenge.
- One page style guide — There is an extensive style guide but this version displays it all on one huge page making it easer to search.
online tools
- Escaped text converter
- codepen for testing out css
- regex101.com
- regexpal.com
tutorials
- learn git branching
More to come
Modified October 13, 2025 — 10:04 AM